


Document Actions
gvSIG-Desktop 1.1. Manual de usuario.
Exportar capa
Introducción
The “Export to...” tool allows you to save the elements selected in a layer in a different format. If no elements have been selected the whole layer will be exported. At the time of going to press the export formats supported by gvSIG were shape, dxf, and postgis and gml.
Exportar a shape
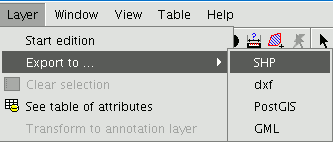
Select the “Layer” option from the menu bar then go to “Export to…/shp”.
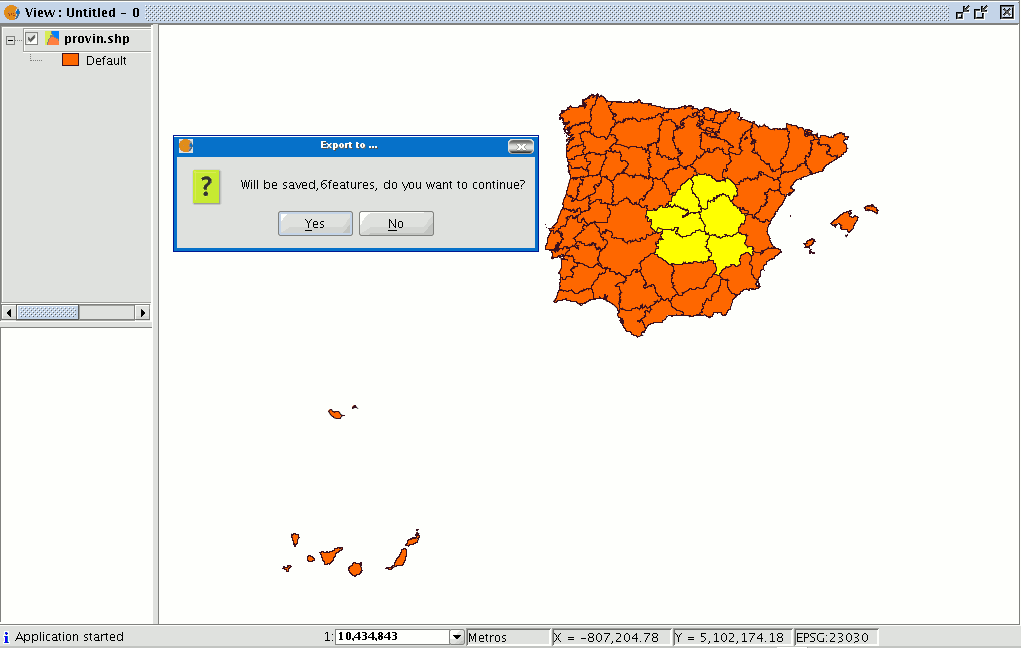
If you have selected elements in the layer to be exported, gvSIG will tell you how many elements are going to be exported and will ask for confirmation before carrying out the operation.
If you continue with the operation, a dialogue box will appear in which you will be asked to select the file the new shape is to be saved in.
When you have accepted, a new message will appear asking whether you wish to insert the new layer into the view.
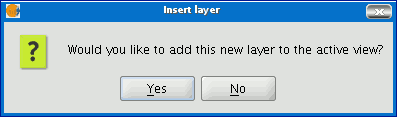
If you click on “Yes”, the layer will be added to the active view.
Exportar a dxf
Select the “Layer” option from the menu bar then go to “Export to…/dxf”.

Follow the same process used for exporting to shape.
Exportar a postgis y Oracle
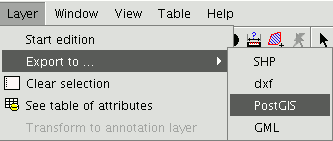
Select the “Layer” option from the menu bar then go to “Export to…/postgis”.
If you have selected any elements, a window will appear telling you how many elements are going to be exported (as in exporting to shp and dxf).
If you have selected any elements, a window will appear telling you how many elements are going to be exported (as in exporting to shp and dxf).
Remember that if the table already exists in the data base, the information it contains will be deleted.
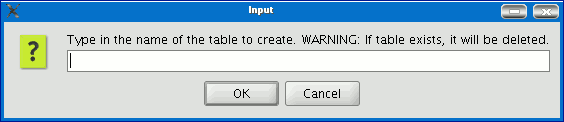
Write the name of the table and click on “Ok”. A new window appears in which you will have to input the parameters of the data base connection.
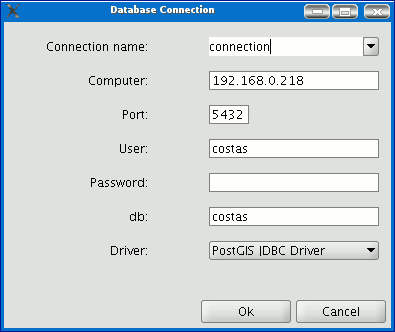
he parameters are:
Name: Name of the connection.
Computer: IP address of the computer the data base is hosted in
Port: Port on which the computer is listening to the postgreSQL service.
**User:**User name recognised by the administrator to make the connection
Password: User password required to validate the connection. db: The data base the new table is to be created in.
Driver: Driver required for the data base. (At the time of going to press, drivers for postGIS and mySQL were available). When you have input the connection parameters, click on “Ok”.
Exportar a gml
Select the “Layer” option from the menu bar then go to “Export to…/gml”.
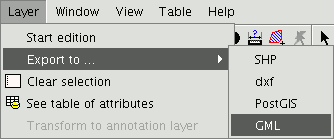
Follow the same process used for exporting to shp or dxf.
Exportar a raster
This tool allows you to extract portions of a raster layer using a selection in the view or by inputting the coordinates that define the portion to be extracted.
It allows the user to change the spatial resolution of the clipping or of the whole image, choose the bands to be extracted or generate a new raster layer for each of the original bands.
To access this option, go to the ToC and select the raster layer you wish to select a portion of.
Then go to the Layer/Export to menu and select the “Raster” option.
The following window appears:
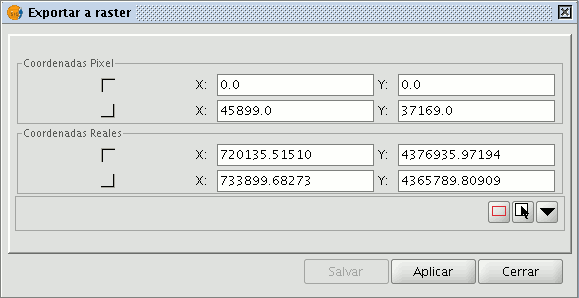
Image clipping
There are two ways of selecting an area to be clipped from the original raster layer:
You can use the text boxes in the window to input the data which correspond to:
- Real coordinates: If the source image is georeferenced.
- Pixel coordinates: If the source image is not georeferenced.
You can also make your selection directly from the view by clipping the whole image or selecting a part of it.
This button allows you to obtain a clipping from the whole image.
This button allows you to obtain a clipping from a selected area in the view. Place the cursor over the image, then click and drag. Check that the text boxes are automatically completed.
If you wish to save the raster layer clipping you have created, click on “Save” and select the location you wish to save this file in. The image will be saved in TIF format.

Changing spatial resolution
The controls that allow you to specify the clipping’s (or whole image) spatial resolution are located in the Clip table, with the additional options panel pulled down (to pull this panel down click on the button). You can define the resolution by specifying the Cell size or the Width and Height of the raster layer to be generated in pixels as well as choosing the interpolation method using the resolution change. At the moment, only the “Nearest neighbour” option is operational.

Band selection
The original raster layer’s band list appears at the bottom of the Clip table. You can use this list to choose the bands the output raster layer will have if you enable or disable the check boxes in the Bands column. If you check the Create one layer per band option, a new layer will be generated for each of the bands checked in the list. The new layers will be added to the ToC.
Saving and Adding a raster layer clipping to the current view.
When you have established all the parameters which define the raster layer clipping you have made, click on “Save”. This opens a dialogue box which allows you to search for a directory to save the clipping in. If you wish to add the layer to the view, go to the “Add layer” button in the tool bar once you have saved the clipping.
Example of a raster layer clipping
This example shows how a clipping is taken from an orthophoto.
First, select the area by defining a rectangle in the gvSIG view.
When you have finished, the coordinates will automatically be input into the text boxes based on the selection. You can fine tune these selected values from the view by inputting the new value directly into the text boxes containing the data.
Then pull down the box. As the resulting image is to be resampled, not as much resolution is required. Therefore, go to the “Spatial resolution” section and select “Width x Height”. This enables the text boxes so that you can input the output raster layer resolution.
When one value is input the other one is automatically completed when you press Enter or when you exit the field, as the proportions between the width and height must be maintained.
The cell size for the chosen output resolution is also calculated. If “Cell size” had been chosen, you would have had to specify the size in metres for each pixel and thus the width and height for the chosen cell size would have been calculated.
You now need to select the bands you want the output layer to have. In this case, select them all as this is a three-band orthophoto and we want to include them all.
Finally, for our example, the “Create a layer per band” option needs to be enabled to do just this.
Each new layer will have the same data type as the original image. If you click on “Save” a dialogue box opens to indicate the directory and image name.
To retrieve the layers you have created, go to the Add layer” button and then to the directory they were saved in.


